A basic understanding of VRFs is necessary in order to move then ISP services like MPLS VPNs. VRFs is also used in situation where BGP and MPLS are not used, the method is called VRF-Lite.
What is a VRF ?
VRF stands for Virtual Routing and Forwarding, the goal of a VRF is to build separate routing table that is independent of the main one. VRFs are the same methods of network isolation/virtualization as VLANs, VLANs are used at the L2 and VRFs are L3 tools.
A VRF is called different ways across the different vendors and sometimes even in the same vendor ![]() . Cisco calls this VRF, Huawei/HP/H3C call this vpn routing and Juniper often refers to this as routing instances. In any case the concept is always the same : We wan to create another routing table which is independent from the main one and also from the other virtual routing table.
. Cisco calls this VRF, Huawei/HP/H3C call this vpn routing and Juniper often refers to this as routing instances. In any case the concept is always the same : We wan to create another routing table which is independent from the main one and also from the other virtual routing table.
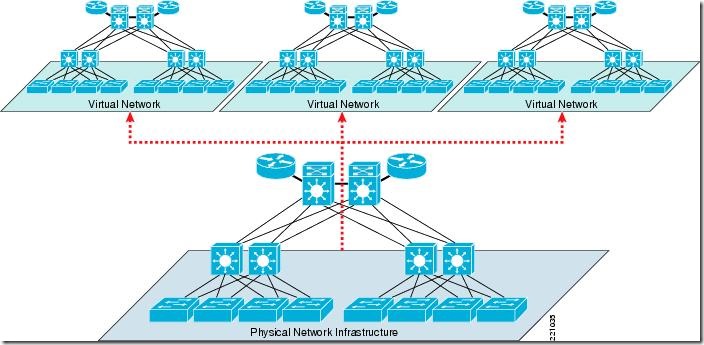
Eventually, VRFs are used to obtain the virtualisation of L3 networks, very much like this :
There is two main modes of implementation, the first one is called VRF-Lite and the second one is used for MPLS VPN technologies.
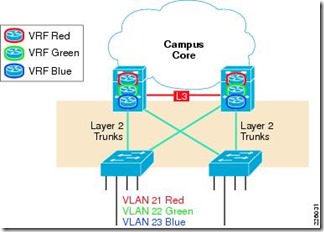
VRF-Lite is the process of linking a VLAN to a VRF, this is most commonly used on L3 switches where you need to reach the SVI interface to be routed. In this case we just move the SVIs into the VRFs we want to enter. This is reprensented like this :
For more advanced scenarii, most L3 protocols “VRF aware”, this means they can run inside a VRF and only for one.
Scenario
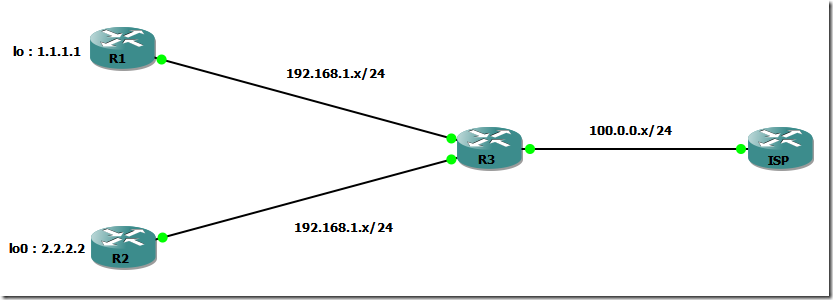
Here we just want to simulate the basic usage of VRFs. Let’s say the network is divided into department that have strong security concerns, they do not want to be able to see each other and they have colliding IP address space.
Here is the topology
First we’ll do the basic addressing on R1 and R2 that we’ll name VRF_R1 and VRF_R2. Then we3’ll create two VRFs on R3 with each interface tied to the corresponding VRF
On R1,
interface FastEthernet0/0
ip address 192.168.1.1 255.255.255.0
duplex auto
speed auto
endinterface Loopback0
ip address 1.1.1.1 255.255.255.0
end
On R2,
interface FastEthernet0/0
ip address 192.168.1.2 255.255.255.0
duplex auto
speed auto
endinterface Loopback0
ip address 2.2.2.2 255.255.255.0
end
Now it’s time to configure R3. As you already know, two layer 3 interfaces of a router cannot be addressed in the same IP space. But with VRFs the fact is…. it’s not the same IP address space.
So first we configure the VRFs. VRFs are identified by a name. In some Implementation of the IOS you also need to define a RD which is a Route Distinguisher (we will see more on this with MPLS VPN) :
On R3
ip vrf VRF_R1
rd 1:1
!
ip vrf VRF_R2
rd 2:2
This is how VRFs are created and we can use the show ip route vrf VRF_NAME to see it :
R3#show ip route vrf VRF_R1
Routing Table: VRF_R1
Codes: C – connected, S – static, R – RIP, M – mobile, B – BGP
D – EIGRP, EX – EIGRP external, O – OSPF, IA – OSPF inter area
N1 – OSPF NSSA external type 1, N2 – OSPF NSSA external type 2
E1 – OSPF external type 1, E2 – OSPF external type 2
i – IS-IS, su – IS-IS summary, L1 – IS-IS level-1, L2 – IS-IS level-2
ia – IS-IS inter area, * – candidate default, U – per-user static route
o – ODR, P – periodic downloaded static routeGateway of last resort is not set
Now we need to move interfaces into the VRFs, this means that any L3 configuration that will be done on one interface is only going to affect the VRF it belongs. Most interfaces can be moved into a VRFs (Ethernet, Loopback, Tunnels…)
On R3,
interface FastEthernet0/0
ip vrf forwarding VRF_R1
no ip address
shutdown
duplex auto
speed auto
!
interface FastEthernet0/1
ip vrf forwarding VRF_R2
no ip address
shutdown
duplex auto
speed auto
Now we can make the L3 configuration on these interfaces and it doesn’t matter is this is overlapping :
On R3,
interface FastEthernet0/0
ip vrf forwarding VRF_R1
ip address 192.168.1.3 255.255.255.0
shutdown
duplex auto
speed auto
!
interface FastEthernet0/1
ip vrf forwarding VRF_R2
ip address 192.168.1.3 255.255.255.0
shutdown
duplex auto
speed auto
!
Now if we check the routing table of each VRF, we will see information for each one, take a look at the interfaces :
R3#show ip route vrf VRF_R1
Routing Table: VRF_R1
Codes: C – connected, S – static, R – RIP, M – mobile, B – BGP
D – EIGRP, EX – EIGRP external, O – OSPF, IA – OSPF inter area
N1 – OSPF NSSA external type 1, N2 – OSPF NSSA external type 2
E1 – OSPF external type 1, E2 – OSPF external type 2
i – IS-IS, su – IS-IS summary, L1 – IS-IS level-1, L2 – IS-IS level-2
ia – IS-IS inter area, * – candidate default, U – per-user static route
o – ODR, P – periodic downloaded static routeGateway of last resort is not set
C 192.168.1.0/24 is directly connected, FastEthernet0/0
R3#show ip route vrf VRF_R2
Routing Table: VRF_R2
Codes: C – connected, S – static, R – RIP, M – mobile, B – BGP
D – EIGRP, EX – EIGRP external, O – OSPF, IA – OSPF inter area
N1 – OSPF NSSA external type 1, N2 – OSPF NSSA external type 2
E1 – OSPF external type 1, E2 – OSPF external type 2
i – IS-IS, su – IS-IS summary, L1 – IS-IS level-1, L2 – IS-IS level-2
ia – IS-IS inter area, * – candidate default, U – per-user static route
o – ODR, P – periodic downloaded static routeGateway of last resort is not set
C 192.168.1.0/24 is directly connected, FastEthernet0/1
Each department is able to ping R3 :
R1#ping 192.168.1.3
Type escape sequence to abort.
Sending 5, 100-byte ICMP Echos to 192.168.1.3, timeout is 2 seconds:
.!!!!
Success rate is 80 percent (4/5), round-trip min/avg/max = 20/25/32 ms
R2#ping 192.168.1.3
Type escape sequence to abort.
Sending 5, 100-byte ICMP Echos to 192.168.1.3, timeout is 2 seconds:
.!!!!
Success rate is 80 percent (4/5), round-trip min/avg/max = 20/25/36 ms
Now to ping from R3 to R1 or R2 we need to specify on which VRF we are located :
R3#ping vrf VRF_R1 192.168.1.1
Type escape sequence to abort.
Sending 5, 100-byte ICMP Echos to 192.168.1.1, timeout is 2 seconds:
!!!!!
Success rate is 100 percent (5/5), round-trip min/avg/max = 12/20/28 ms
R3#ping vrf VRF_R2 192.168.1.2
Type escape sequence to abort.
Sending 5, 100-byte ICMP Echos to 192.168.1.2, timeout is 2 seconds:
!!!!!
Success rate is 100 percent (5/5), round-trip min/avg/max = 20/27/36 ms
To route inside a VRF, you need to specify the VRF where you want to add L3 information. To test this, we need to create a route on R3 to reach the Loopback on R1 and R2 from within their respective VRFs :
R3(config)#ip route vrf VRF_R1 1.1.1.1 255.255.255.255 192.168.1.1
R3(config)#ip route vrf VRF_R2 2.2.2.2 255.255.255.255 192.168.1.2R3#ping vrf VRF_R1 1.1.1.1
Type escape sequence to abort.
Sending 5, 100-byte ICMP Echos to 1.1.1.1, timeout is 2 seconds:
!!!!!
Success rate is 100 percent (5/5), round-trip min/avg/max = 20/28/44 msR3#ping vrf VRF_R2 2.2.2.2
Type escape sequence to abort.
Sending 5, 100-byte ICMP Echos to 2.2.2.2, timeout is 2 seconds:
!!!!!
Success rate is 100 percent (5/5), round-trip min/avg/max = 16/30/44 ms
So for everything you want to do inside a VRFs you need to specify the VRF in which you want to work.
Now let’s push the scenario a little further.
What if the network 1.1.1.0/24 on R1 and the network 2.2.2.0/24 wants to communicate together despite of the fact they aren’t in the same VRFs ?
Technically there is one way to do this inside R3 to have inter-VRFs communication but the goal of the VRFs is to enforce the isolation. We need to route through another L3 device to do so and if we want to enforce security at this point, the L3 device doing the routing should be a firewall.
R4 is going to take the role of the firewall here, we want to validate the concept of inter-VRF routing
InterVRF Routing
If we want to do two subinterfaces, we need to route outside of R3 to R4 by using subinterfaces on R3.
These subinterfaces will belong to their respective VRFs on R3 however there will be no VRFs configured on R4 so that traffic can enter one subinterface on R4 and go out the other one linked to the destination VRFs. Let’s take a look at this :
On R3, we define two subinterfaces going to R4. Each one will be doing tagging in a different VLAN and placed in a VRF. VLAN tagging is used to discriminate at Layer 2 between one interface or the other
interface FastEthernet1/0.10
encapsulation dot1Q 10
ip vrf forwarding VRF_R1
ip address 100.1.1.3 255.255.255.0
!
interface FastEthernet1/0.20
encapsulation dot1Q 20
ip vrf forwarding VRF_R2
ip address 100.2.2.3 255.255.255.0
R4 is also configured with subinterfaces but no VRFs :
interface FastEthernet0/0
no ip address
speed 100
full-duplex
!
interface FastEthernet0/0.10
encapsulation dot1Q 10
ip address 100.1.1.4 255.255.255.0
!
interface FastEthernet0/0.20
encapsulation dot1Q 20
ip address 100.2.2.4 255.255.255.0
Now the routing needs to be configured, R1 and R2 will have their default gateway pointing to R3. As they are not aware of the VRF, the route are only configured in the global routing table :
On R1 and R2,
ip route 0.0.0.0 0.0.0.0 192.168.1.3
On R3 we also need to configure the default route except here R3 is VRF aware so we need to specify the next hop in each VRF to the correct subinterface on R4
On R3,
ip route vrf VRF_R1 0.0.0.0 0.0.0.0 100.1.1.4
ip route vrf VRF_R2 0.0.0.0 0.0.0.0 100.2.2.4
Last but not least, R4 needs to indicate the routes for 1.1.1.0/24 and 2.2.2.0/24.
On R4,
ip route 1.1.1.0 255.255.255.0 100.1.1.3
ip route 2.2.2.0 255.255.255.0 100.2.2.3
Now let’s test the interVRF routing :
R1#ping 2.2.2.2 so lo0
Type escape sequence to abort.
Sending 5, 100-byte ICMP Echos to 2.2.2.2, timeout is 2 seconds:
Packet sent with a source address of 1.1.1.1
!!!!!
Success rate is 100 percent (5/5), round-trip min/avg/max = 76/88/108 ms
Let’s take a look at the traceroute to see the packet path :
R1#traceroute 2.2.2.2 source lo0
Type escape sequence to abort.
Tracing the route to 2.2.2.21 192.168.1.3 28 msec 20 msec 20 msec
2 100.1.1.4 36 msec 40 msec 40 msec
3 100.2.2.3 68 msec 52 msec 64 msec
4 192.168.1.2 92 msec * 92 msec
The packet goes through R3 to go out of the VRF by R4 and back to R3 in the other VRF.
Now if we want to have the overlapping networks to communicate, we need to use VRF Aware NAT. Each of the VRF will be mapped to another address that could be taken from a pool or an interface.
First we need to configure two pools for each VRF :
On R3,
ip nat pool VRF1 11.11.11.0 11.11.11.254 netmask 255.255.255.0
ip nat pool VRF2 22.22.22.0 22.22.22.254 netmask 255.255.255.0
Next we need to define which interfaces are going to be part of the NAT, on R3 we have F0/0, F0/1, F1/0.10 and F1/0.20 :
On R3,
interface range f0/0 , f0/1 , f1/0.10 , f1/0.20
ip nat enable
end
As in standard NAT we can define an ACL that will select which traffic can be NATed or not :
On R3,
ip access-list standard VRF_R1
permit 192.168.1.0 0.0.0.255
ip access-list standard VRF_R2
permit 192.168.1.0 0.0.0.255
Define two NAT rules, there rules need to be VRF aware :
ip nat source list VRF_R1 pool VRF1 vrf VRF_R1
ip nat source list VRF_R2 pool VRF2 vrf VRF_R2
R4 should have the routes to the NATed destination :
ip route 11.11.11.0 255.255.255.0 100.1.1.3
ip route 22.22.22.0 255.255.255.0 100.2.2.3
And now you can join the loopback by using the ping source from the 192.168.1.x network in each VRFs :
R1#ping 2.2.2.2
Type escape sequence to abort.
Sending 5, 100-byte ICMP Echos to 2.2.2.2, timeout is 2 seconds:
!!!!!
Success rate is 100 percent (5/5), round-trip min/avg/max = 40/47/72 ms
R2#
*Mar 1 01:16:26.155: ICMP: echo reply sent, src 2.2.2.2, dst 11.11.11.1
*Mar 1 01:16:26.227: ICMP: echo reply sent, src 2.2.2.2, dst 11.11.11.1
*Mar 1 01:16:26.247: ICMP: echo reply sent, src 2.2.2.2, dst 11.11.11.1
*Mar 1 01:16:26.287: ICMP: echo reply sent, src 2.2.2.2, dst 11.11.11.1
*Mar 1 01:16:26.331: ICMP: echo reply sent, src 2.2.2.2, dst 11.11.11.1
R3#sh ip nat nvi translations vrf VRF_R1
Pro Source global Source local Destin local Destin global
icmp 2.2.2.2:19 2.2.2.2:19 11.11.11.2:19 192.168.1.1:19
icmp 11.11.11.2:19 192.168.1.1:19 2.2.2.2:19 2.2.2.2:19
— 11.11.11.2 192.168.1.1 — —
Of course if you want to join the loopback from the outside you need to make a static NAT entry, this is a common scenario when hosting services on site.
Enjoy !


Good article fro Beginner…
Hello,
I want to do Static nat on my PE router…… I have three different sites which are in same vrf and all sites have a same LAN subnet for example in site one i have two lan ips 192.168.1.1/24, 192.168.1.2/24 ……. on other two sites the same two ips……..kindly provide the static nat full configuration with explanation thanks….
Hi,
You just need to do a static NAT configuration within the VRF. NAT is VRF Aware so you can just “ip nat source inside vrf
Thanks a lot for the article. Solved a lot of my doubts..
thanks . many thanks